Sunday, June 14, 2015

Piano/Study Room Mood Board

I am finally in the process of working on some of the other rooms in my house.  I've been really wanting to get my piano/study room done because it is the first room you see when you walk into my house.  We opted out of having a dining room because we have a large enough table in our eat-in area to host our guest.  Also we have a grand piano so our dining room is where it is located, along with my small desk and computer.

I decided to play around with Olioboard and create a mood board of what I'm thinking I want my area to look like.

Currently have:
-Brown Piano
-dark brown/black bookcase
-powder blue desk with brown antique chair

Need:
-Gray Rug (rugs usa)
-Two gold tufted chairs (target)
-Curtains with gold rod (target)
-Gold table to host decanter, etc. (target)
-Maybe a small table in between the chairs (not sure)
-musical artwork for the wall (made by me)
-new lighting for the space (not sure)

Piano Room

Hopefully I can get a head start on it and have it completed by the end of the year.  Little by little.  I also have been working on my daughter's room and will share at the end of the summer.  I have one thing to build, one painting to paint, find lighting, hang something vinyl, get some pillows.  My kitchen is also almost complete.  I need to find lighting for the eat-in area, and above the bar, need 4 bar stools, and possibly a rug near the sink.

What do you think?  What are you working on this summer?  Would love to hear from you in the comments.

Monday, May 4, 2015

Mason Jar Decor


Wooden Plaque with Mason Jars

This was my inspiration piece from Target.  I thought it was super cute, but I did not want to spend $25 on it and I thought I could probably make it cuter for less.  I already have a bunch of pallet pieces laying around so while I was painting my bench for our kitchen table I took a pallet in the size I wanted and dry brushed it heirloom white to give it an shabby antique look.

Easter weekend my sister-in-law, mother-in-law and I left for Canton for the day. Canton is the best place to find good deals and neat gifts/decor etc.  I knew I wanted three jars like the picture so I set out to get three blue mason jars.  I love mason jars and have quite a collection whether it be my drinking cups or they are used for decor.  I found the mason jars for super cheap and identical.  It was meant to be!

Then the hubby and I were at Lowe's and to finish the project I needed three pipe clamps and some hardware.  When we got back home I ran into a few small glitches.  The mason jars have a smaller diameter on the top than the bottom so to attach to the board I needed to up the height.  I found three little wooden blocks that I had from another project and glued them on equally spaced out on my pallet.

Once the wooden blocks were glued on I drilled screws into the pipe clamps through the blocks into the pallet.  The screws were used versus nails so I could insure it would hold the jars.  Then I put the jars into the clamps and tighten them around the jars.

Then I attached a wire hanger on the back and hung above my desk.  My decor could be decorative or currently it holds my paintbrushes and fun markers and pens.


At first I thought I hung it to high above my desk, but it worked out because it could be decor as well as functional and underneath my desk I am wanting to fill the empty space with idea boards and probably some pictures of my kiddos.


Definitely a fun quick project!


Supplies:

  • Pallet wood
  • Three Jars
  • Three pipe clamps
  • Three wooden blocks (opt)
  • Wood Glue
  • Three screws
  • Picture Hanger

Thursday, April 16, 2015

Do you have patience?

Have you ever thought about how you ended up where you are at?  How every decision or event in your life built upon each other and led you to where you are.  How God leads you through trials but also provides miracles and joyous occasions.  How life can be so dang hard at times but to someone else you have everything they could possibly dream of.

I will say I am a very blessed person and it wouldn't be without my faith in Jesus that keeps me going.  I could blame many things in my life on other people not supporting me or directing me elsewhere, but it all boils down to me.  I made those decisions, good or bad.  I am the reason I am where God has me right now.  Do I have everything together, definitely not, but I try daily to live with a happy attitude and a happy heart and live my life for Jesus.

I personally have gone through my own struggles in life and have fled from God and ran away from my troubles because I was scared or unsure.  I have cried like a baby.  I have smiled with my whole face and heart.  I have hidden in darkness.  In the end I have always had to take one step at a time and pick myself up because there is always a light at the end of the tunnel to something bigger and better.

In my adult/marriage life I feel like God has tested me the most.  Patience has definitely been at the top of my list and a word that doesn't come easy.  Nick and I have been patient for a long time and we are still working on that word.  We have often felt God has given us a green flag and then in a matter of minutes we are knocked back down again.  I keep hearing the word "baby steps".  Yep that is what we have been doing for a long time - baby steps.  I'm tired of baby steps...I want to take a giant step.  I want a for sure thing.  I want this rock lifted off part of my shoulders.  I want to feel free again.  Then I'm back to the word patience again.  I know God's timing is perfect.  Nick and I have definitely been through that before.  So we keep trusting in God and praying, and having people pray for us that 2015 is going to have some great things in store for our family.

Many people asked how we ended up where we are today.  Nick and I are pretty simple people, with a lot of love to give, and an adventurous soul.  We live life to the fullest and enjoy meeting people on the way.  We've always had our dreams and what we want out of the life and for our family.  In January 2014 we hit rock bottom.

We broke straight through to the core and the ground shook.  It shook hard.  We were both scared and our dreams became crazy real.  Nick was sick.  Answers could not be found.  Many nights spent at the hospital and shuffling kids and getting myself to work.  We both felt helpless and lost.  Sure I probably told you things were fine, we were moving along, but deep down I was hurting hard.  I was terrified.  I couldn't possibly describe to you how Nick was feeling on the other end.  All I know is he had a lot of time to think.  God is good, he performs miracles and not always gives you answers.  And that is exactly what he did.

Four months later we sold our house and made our dreams into reality.  We knew making our dreams come true would come with a price.  We knew we would end up hurting people, but not intentionally.  We knew we would be leaving a great church family.  We knew we would be removing ourselves from our support group of friends.  From our support group, our family.  We knew financially we would be hurting again for a short time.  But that ground shook and God said follow your hearts and desires, listen to me for I have something better prepared for you and your family.

We prayed.  Oh how we prayed and questioned.  And things have slowly fell into place.  Is the puzzle finished yet? No, but it is close.  Will it ever be finished, probably not.  This past year has been a roller coaster of emotions, but we both have felt peace and we followed God.


I constantly refer to a letter my dad once wrote to me where in the letter he wrote:

".......................It truly is your world to conquer and make the most of it to whatever level you strive to pursue.  It is your future, and it is your dream from which to make reality....................Control your destiny and do it with character.  Enjoy and treasure every moment along the way......................"


You only live once and the choices you make will lead you on a path.  You might not have full control on the path you are led on, but trust in God and his path will ultimately be the right path.  That path may have struggles, but it may have amazing moments.  God never gives you more than you can overcome.  Overcome and become stronger.  Overcome and mentor others.  Overcome and see the beauty in life.

Nick and I are overcoming and we still need your prayers.  We are right where we need to be.  Enjoying our three little blessings.  Enjoying nature and God's beautiful land.  Enjoying and learning new things about each other.  Enjoying the simple life.  Starting new in a great church.  Living our life for God.  No doubt we are blessed and for that I'm thankful.  I'm thankful for everything that has led me to this moment because whether good or bad it has made me who I am today.  It has given me these three blessings.


Tuesday, March 31, 2015

Turquoise Addict

Yes I will admit I love turquoise.  How could you not!?  It is exciting, calming, rich, and reminds me of the beach.  With that being said that is my accent color through a majority of my house.

My husband and I recently built a farm house table out of pallets (you can view here) and on one side closest to the wall we are going to eventually build a large bench for our kids and then on the other side I wanted 4 mix-matched chairs in a turquoise monochromatic color scheme.

I set out to my antique and consignment shops and purchased 4 different chairs. To find the perfect chair is very hard and so many people want to sell sets of chairs and not individuals.  Then when you find an individual chair its broken or not exactly what I was looking for or way too expensive.

It took me two weekends!!  Once I got the chairs I wiped down, sanded, and primed each chair.  My local Ace Hardware was having a sale in March on paint.  99 cent pint cans.  You can not beat that!  I picked out my color scheme and bought 4 cans.

The process for each chair - prime, paint, paint again, seal with poly


I love how it turned out and the pop of color it brings to my eating area.


Next on the list - Annie Sloan paint and my birthday bench!  Any tips I should know?  Post below.


Thursday, March 19, 2015

Baseball Wreath

Baseball is in full swing in the Bryan household.  We have two ball players this year.  Caden is playing T-ball for the Rock Hounds.  Connor is playing Coach's Pitch for the Astros.  Miss Codi is super jealous, but I told her she could be their cheerleader which made her super happy.  My evenings are now filled with baseball practice (I'm in the early stages of carpool mom) and games until June.  I love every minute of it even if I am exhausted and dinner plans are now on the back burner.

To hit off baseball season I thought it would be a cute idea to cheer on my favorite players with a wreath for my front door.  I wanted it to be in the shape of home base so I had to get creative since they do not make canvas in that shape.

I took a piece of cardboard and cut out the dimension of home base.  17 in across the top, 8.5 in down on each side and 12 in diagonals on each side of the bottom of the base.

I then took canvas (which you can buy by the roll or cut it off of a stretch canvas board) and drew out the same dimensions, but I cut it about an inch more so I would have sides to fold over an glue around the cardboard.

I wrapped the cardboard with the canvas and hot glued the sides.


When I was down it was time to paint.  I wanted a chevron background, but I wanted a subtle color since the background was white, I picked a creme color to paint the stripes.  I made a template for my chevron pattern.  It was about 4 inches tall with the points at 2 inches. I traced the template about four times, leaving a space about the same size of the template in between.


Once the chevron design was traced onto the canvas, I painted the creme color every other line.


Then I painted on my baseball threading look with black and red paint.  I added a heart for our love of baseball and a cougar paw because we are in China Spring and we are the cougars (Columbia Blue).  I used a black paint pen to write the boy's names.


To hang it, I cut a piece of wire and spiraled it around a pencil to get the spiraled look and attached it through the holes I cut at the top.


I added a cute bow to the wire and hung it on my front door!


Loved how it turned out and love cheering on my superstars.

Tuesday, March 17, 2015

Rustic Ironing Board

Happy St. Patrick's Day!  Hope you are wearing your green today.  

Over Spring Break I had the chance to work on one of my projects.  My mom gave me an old ironing board that she has had since we were little.  I was on Pinterest and happen to see a craft done with one and thought it was perfect for my ironing board.

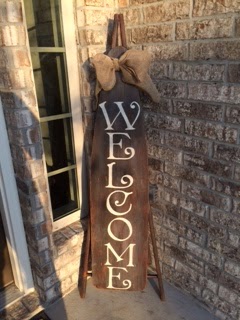
I created a Welcome sign for my front door.

I started out by sanding the board and then applied Rustoleum Kona Stain to the board.

Once that dried I printed out the lettering - one letter per page and I chalked the back of the letters and transferred them to the ironing board.


I then took a paint brush and Heirloom White paint and painted my letters onto the board.


The next day once the letters dried I sanded the ironing board and applied Rustoleum Weathered Grey Stain to antique the lettering.


Then I applied Polyurethane to seal the board.

I added a bow out of burlap and put it on my front porch!


Tuesday, March 3, 2015

I heart Wood Pallets

I am currently in a phase of using old pieces and making them into usable and functional pieces for my home.  We recently bought a new house this past summer and when you have a brand new house and did not get to pick anything out for it, I immediately wanted to put my taste on everything in the house to make it mine.

Since we are in a new neighborhood I was lucky enough to obtain about 20 wood pallets that were left over from the construction crews.  I've always seen some cool stuff on pinterest that people make from pallets and my ideas ran wild.

One issue we had at our house is that we can not all sit at the kitchen table together and we needed to have a larger table and more seating, but we do not have the money to purchase a new table.  I told my husband we should make one out of pallets.  I love the farmhouse look and it would be perfect.  And that is what we did!

First we took two pallets that had some good bones and not rotted and then we had to pull off boards and basically puzzle a new top together for two pallets.

Then we sanded the pallets down and I picked out stain colors and paint.

I stained both tops with Rustoleum Kona and then Rustoleum Weathered Gray.  Then I had polyurethane to the tops to seal them.

For the base and the legs I painted them Rustoleum Heirloom White

The challenge was putting the 8 ft table together and getting it into the house.  We accomplished it and love how it turned out!


We still have to make a bench for one side of the table - which our kids will sit at.  We will do the same process but use half of the pallet and then paint it all heirloom white.

I am working on finding 4 different wooden chairs and will eventually paint them a monochromatic of Turquoise.  Kind of like below

green + mint chairs

Last I'm going to make a burlap runner for the table (more pictures to come).


Another project I've done is make a sign out of pallets.  I went to a local store Junque in the Trunk and they were having a sidewalk sale where I picked up some rusty letters for $5.00.  I attached the letters to a pallet sign and now it hangs near my table in the eating area.


I have many other things on my list such as these and can't wait to find time to work on it.

Upcoming projects:
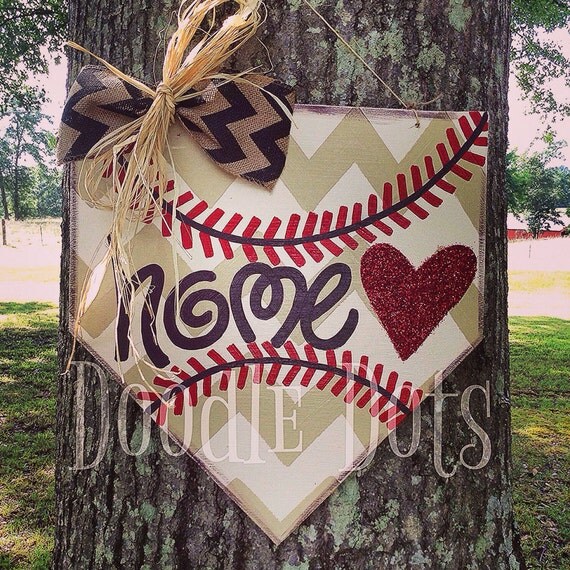
Baseball Home Plate Door Hanger
It's baseball season - for my front door with the boys name and #s

The easiest way to make the mason jar holder - Tips & tricks & frequently asked questions. These are great for bathrooms, craft rooms, kitchens, & so much more! A must pin!    House of Turquoise: Four Chairs Furniture  House of Turquoise: Artistic Designs for Living
I'm going to make this to go above my desk so that it can hold my markers, pens, etc.

@egaillardetz think this is right up your alley! Baseball DIY Project Ideas That are a Homerun!Baseball Mom here and I need some cute shoes for the games

Vintage Ironing Board Turned Welcome Sign | The Rustic Pig
For my front door - I have the old ironing board - just need to stain and put the letters on

Old vintage door ~ Raleigh Kitchen Photos Design Ideas
Looking for an old door to paint like this one for my pantry

This Table would b perfect in my breakfast nook :)
Re-do my old table with a fun color at the bottom for the kids in the game to play games and puzzles on.

Keep Legos where they belong instead of underfoot! Simple DIY personalized trays for projects & creations.
Gifts for the kiddos - they are really getting into legos - could be something fun on a road trip too

made of a board pulled from a pallet, spray painted black, then painted with a brush in Valspar Antique White Eggshell, two coats.  While the sign was drying I printed the letters in Times New Roman (just the outlines to save ink) and cut them out, traced on to the board, and then painted with black acrylic paint the letters.  After that dried, I simply took a power sander to the sign.
For my laundry room door


So there you have it!  I'm going to be a busy bee =)  What are you into crafting these days or making?  Share below - would love to see!!!